Monday, November 28, 2016

BEAT yourself to the GODS!!!

Hire an MUA (makeup artist) or beat yourself? That is the question that goes unanswered for many makeup virgins! No it's not easy creating a Beyoncé beat, but, you can get it close damn it! And with much practice, like anything in life, you will perfect your skill!
You can start now! Yep, right now, by trying the demonstrated steps I listed below! Take a before and after picture of your work for your own recollection of growth, and continue that until you get better! Over time, you can compare your earlier work and witness how your talent has transformed! How do you think MUA's are made? Overnight? Happy beating boojiBEEs!

*THE VIDEOS BELOW CANNOT BE VIEWED ON MOBILE. YOU MUST VIEW FROM A DESKTOP*

Step 1:
Clean your face, apply a hydrating moisturizer. Next,
apply your color corrector concealer (if you need any).
This helps for a more clearer, smoother and
flawless look.


Step 2:
Grab your color foundation. Apply all over the face,
paying extra attention to the areas where your corrector
concealer has been laid. Being sure no other
colors from the color wheel can been seen.
Allow for foundation to "bake".


Step 3:
For me, I do brow fill/enhancement next.
Some MUA's start with the eyeshadow colors.
Whichever you prefer. After you complete these
two steps, you want to continue with completion of
your full face. This is where you focus attention on highlighting
& contouring. Blending is important as well.
(For another blog post, I'll do a more in depth "tutorial")


Final Look:
I call a look of this stature "Fall Faces".
The light and dark shades are a great combo
of mixed & match colors within this season!
Yeah I could've went with a darker lip,
but why do the obvious?
BEE different!


Hair & Makeup by me.
Cut Jeans & Styled by me.
Book with boojiBEE! 


For more beauty buzz on hair, nails and makeup or MUA related topics subscribe to my blog or check back weekly!


Monday, November 21, 2016

4 AWESOME Finds for every MAKEUP ADDICT!


So I decided to go outside the box a little with this post and create a VLOG! (Video Blog).
I actually decided on this last minute and happy I did. I think "vlogs"will be added to my list of  "go to" suggestions when wanting to fully engage my clients. Which I want that all the time!
But I promise to not over kill as long as you all promise to not judge my very first vlog.
I will not get better with time! Lol! I promise!

Well, without further a due, enjoy!

"4 Awesome and very useful beauty finds that makeup artists love! That wonderful color wheel, an on the go vanity mirror, a too die for matte shadow pallet and 5 rich & glossy lip colors by Adrienne Vittadini! You would not believe how much money I saved!"


For more beauty buzz on hair, nails and makeup or MUA related topics subscribe to my blog or check back weekly!


Thursday, November 10, 2016

"Thingy" Holders for Makeup Artists'!

You know that one brand ice cream, where they pack all this yummy stuff in clear jars? Yes, TALENTI! Talenti ice cream is one of my most favorite kind of ice creams. One reason is because they use real ingredients to make their products, and two, once I'm done with dessert, I keep the clear jars to store my "thingys"! Not only am I getting my money's worth, I'm helping the Earth by recycling. It's such a win, win situation here. 
Being a mother of 3 children and managing a beauty business,  my resources are limited and must be calculated to a science. I don't have the cash to waste on pricey containers that you can make & create for yourself. Besides, my clients appreciate the originality when it comes to BoojiBEE. That's why they support my brand.

Pictured here are my containers I've kept after completion
 of the great tasting Caramel Crunch Ice Cream. 
As you can tell, it's my go to flavor in the Talenti family!


What I decided to do with them was wash them clean,
and use them to store my lippies for this season, 
 hold brushes I use regularly and my small eyeshadow 
pallets I use to create beautiful Fall faces!
I actually use these instead of a makeup 
belt/carrier/pouch when working on a client. 


Storing my lippies in a cool, secure place keeps them 
from sweating and the top becoming loose while 
floating around in my MUA cosmetic bag.
 Accessible storage also helps me to find 
the colors I want more easily.


In short, the next time you snack on 
your favorite dessert, take a look at it's packaging
and see if you can't DIY and create something unique
and useful. Building into your business or your brand
takes energy, careful financial analysis and creativity!
You don't always have to go out and spend money 
on the things you need to operate efficiently.

Way before I decided to get serious about my career
in the beauty industry, I was a true crafter! I designed
t-shirts, handbags, jewelry and hats! You'll get to shop
some of the tee's I designed once I add them to 
my website soon!

For more beauty tips on nails, hair, makeup and more, please subscribe to my blog! Also, share this blog on your social media pages in hopes of creating a larger community of boojiBEE's!


Saturday, November 5, 2016

Create your own U-Part Wig or book BoojiBEE 🐝

Ever wanted a style you can wear for protection against heat damage or while you workout? A U-Part wig is perfect if your looking for a quick, go-to style. Women who love U-Parts usually don't want glue or heat in their hair or they'd rather skip the hours it takes to complete a contemporary sew in. 

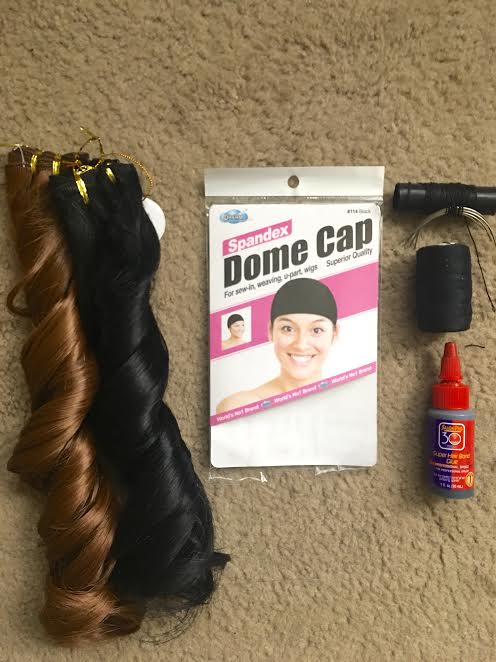
What you'll need to get started:
1. Your Hair 
2. A Dome Cap
3.Needle & Thread
4. Hair Glue
5. Shower Cap/Plastic Bag


Once you've gathered your items, shampoo & condition your natural hair and then braid it. Braid pattern doesn't matter necessarily. However, you want to make sure you braid sturdy along your perimeter because this is where you will sew down your U-Part Wig

After your hair is braided, place your shower cap or plastic bag on your head
 ( as I didn't have a plastic shower cap and needed to improvise)
 and put your dome cap on over it. (Like so in the image below)
 This helps keep the glue from seeping through the
 dome cap and getting on your hair. 


After you've put shower cap/plastic bag and dome cap on your head, 
your ready to start bonding your extensions onto the dome cap.
 *If your using a more expensive brand hair, I suggest you
sew your extension onto the dome cap.*


Make sure you leave enough space to cut out
 where your leave out is going to be. This area 
will be covered with your natural hair once sewn 
onto perimeter.


Now that you have your hair attached to your dome cap, blow dry the hair glue/extensions
 (if it's bonded) with a blow dryer first for about 5 minutes before taking off
 and removing the plastic bag/shower cap. Once completely dried and the glue has
 adhered to the cap, peel off the plastic bag/ shower cap very carefully. 
Cut all excess material from around your cap. 
This causes for a better snug fit.


Take your time so you won't accidentally cut your extensions.


Lastly, before sewing along your perimeter, try on your U-Part Wig
making sure it's just right. You don't want any lumps or bumps.


If everything measures correctly, thread your needle and sew! 
You may need silver hair clips to help hold in place 
while you sew along your perimeter. 


Sew sturdy but not too tight where your pulling on your edges!
Once your sewing is completed and your U-Part is
secure, begin to style as desired. Make sure to moisturize
your leave out well. Having dry, brittle leave out causes 
more damage and breakage to your hair when heat is applied,
Especially if you have highly textured or coarse hair.
I use coconut oil daily on my natural leave out.


Add me on Snapchat @boojiBEE


 Watch more of my snaps on SC: @boojiBEE

For more beauty buzz on hair, nails and makeup or MUA related topics subscribe to my blog or check back weekly!